NIS Setup (Rocky Linux 8)
This guide outlines the steps to set up a basic and functional Network Information

This guide is for Rocky Linux 8. If you are using a different version of Linux, the steps may vary.
Overview
Setting up a Linux server cluster often requires central authentication systems, including options like LDAP and NIS. In this guide, we focus on using NIS (Network Information Service) to manage user authentication and ensure seamless integration across nodes. This guide provides comprehensive, step-by-step instructions for establishing a robust and functional NIS configuration. By centralizing user authentication across multiple Linux servers, NIS reduces administrative overhead and facilitates seamless integration of distributed systems, including password-less SSH logins.
Architecture
Network Information Service (NIS) is a client-server directory service protocol designed to distribute system configuration files—such as user accounts, groups, and hostnames—across a network. Below is an overview of the NIS architecture:
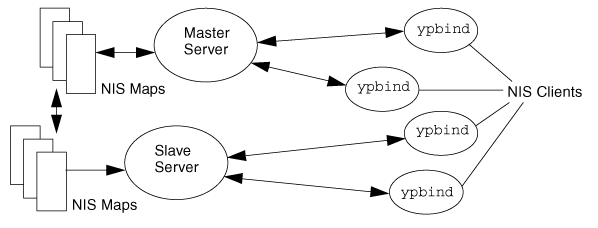
Key NIS Maps
| Map Name | Description |
passwd.byname | User account information by username |
passwd.byuid | User account information by UID |
group.byname | Group information by group name |
group.bygid | Group information by GID |
hosts.byname | Hostname-to-IP mapping |
hosts.byaddr | IP-to-hostname mapping |
These maps form the core of NIS functionality, providing structured access to user and host data for network-wide consistency.
Server-Side Configuration
Install Necessary Packages:
Install the required components for NIS server functionality.
bashdnf -y install ypserv rpcbindSet NIS Domain Name:
Define a unique domain name for your NIS setup.
bashypdomainname hpc echo -e "\nNISDOMAIN=hpc" >> /etc/sysconfig/networkAllow All Hosts, Users, and Groups:
Configure NIS to permit unrestricted access. Adjust this for stricter security in production.
bashecho "* : * : * : none" >> /etc/ypserv.confQuoteWarning: This configuration allows unrestricted access to all hosts, users, and groups, which may pose security risks. For production environments, consider defining stricter access control policies to limit exposure.
Enable and Start Services:
Activate the necessary services to run the NIS server.
bashsystemctl enable --now rpcbind ypserv ypxfrd yppasswdd nis-domainnameInitialize NIS Maps:
Generate the initial NIS maps, which include user and group data.
bash/usr/lib64/yp/ypinit -mUpdate NIS Maps After Adding Users:
Refresh the maps whenever changes are made to user or group data.
bashmake -C /var/ypOptional: Configure SELinux:
Adjust SELinux policies to accommodate NIS functionality.
bashsetsebool -P nis_enabled on setsebool -P domain_can_mmap_files onConfigure Firewall:
Firewall configuration is a critical step to ensure the security of your NIS setup. It controls the network traffic that can access your server and prevents unauthorized access. Consider performing this step before enabling services to avoid exposing your system during configuration.
Edit
/etc/sysconfig/network:bashecho 'YPSERV_ARGS="-p 944"' >> /etc/sysconfig/network echo 'YPXFRD_ARGS="-p 945"' >> /etc/sysconfig/networkEdit
/etc/sysconfig/yppasswdd:bashecho 'YPPASSWDD_ARGS="--port 950"' >> /etc/sysconfig/yppasswddRestart Services:
bashsystemctl restart rpcbind ypserv ypxfrd yppasswddConfigure Firewall:
bashfirewall-cmd --add-service=rpc-bind firewall-cmd --add-port={944-951/tcp,944-951/udp} firewall-cmd --runtime-to-permanent
Client-Side Configuration
Install Necessary Packages:
Install the required components for the NIS client.
bashdnf -y install ypbind rpcbind oddjob-mkhomedirSet NIS Domain Name:
Define the NIS domain for the client system.
bashypdomainname hpc echo -e '\nNISDOMAIN=hpc' >> /etc/sysconfig/networkConfigure NIS Client:
Set up the client to connect to the NIS server.
Edit
/etc/yp.conf:bashecho 'domain hpc server controlplane-01' >> /etc/yp.conf
Enable and Start Services:
Activate the services required for NIS client functionality.
bashsystemctl enable --now rpcbind ypbind nis-domainname oddjobdConfigure Authentication:
bashauthselect select nis --forceThis command configures the system to use NIS for authentication by updating the PAM (Pluggable Authentication Module) stack. It ensures that users authenticated via the NIS server can access the system. This step is crucial for enabling centralized authentication in an NIS environment.
To create home directories on initial login:
bashauthselect enable-feature with-mkhomedir
Optional: Configure SELinux:
Adjust SELinux policies to support NIS client operations.
bashsetsebool -P nis_enabled onVerify NIS Server Binding:
Check which NIS server the client is connected to.
bashypwhichExpected output:
plaintextcontrolplane-01
Change NIS Password:
Update the NIS password for a user.
bashyppasswd
Conclusion
By following this guide, you can successfully set up and configure NIS on both the server and client sides. This setup centralizes user management, simplifies authentication across multiple systems, and reduces administrative overhead. For production environments, always review security settings to ensure compliance with organizational policies and best practices. If you encounter issues, consult the system logs, verify service statuses, or check network configurations to identify potential misconfigurations. With proper setup and maintenance, NIS can significantly streamline system administration and improve operational efficiency.